Hi!
Today I'm going to be showing you something special about my Midori Traveler's Notebook... How I'm turning it into a quasi-Filofax!!
I got my Midori 3 and a half weeks ago, and since then I've been happily turning it into my planner!

As you will probably know if you've seen my youtube videos, I used to use a personal sized Filofax as my planner. It consisted of 3 main sections: Diary, Organisation section (lists, lists, lists), and Reference (important information), and sometimes I had a notes section too.
Therefore, I knew that I had to have the same sections in my planner! It was fairly simple to set up, initially! I have 3 notebooks in my Midori- 1) Diary (WO2P), 2) Organisation notebook, and 3) My Notebook notebook! My Reference section will soon be transferred over to the back of my Organisation notebook!
If you haven't already, please see this post where I wrote about the set-up of my Midori :) - You don't have to watch the video, because the sound quality is poor!).
But I did struggle with some things... because my Midori isn't a Filofax!
I used a Filofax for almost 2 years, so it was difficult to transition to another system completely. For a while, I didn't transfer everything over, instead keeping my Osterley personal in Wine out with my old Filofax set-up, because it was my safety blanket! But soon I became more in love with the Midori, and less in love with the Filofax (faulty ring mechanisms made me bitter!), and I've put my Osterley back on the shelf, and started using my Midori for almost everything!!
But even though I fell in love with my Midori, I still found that I couldn't do some of the things in it that you can with ease inside Filofaxes, such as rearranging pages. That is an obvious thing to say, because the Midori doesn't have rings, but you don't realise it until you really miss the flexibility of it!!
Also, I watch a lot of filofax videos, and see a lot of pretty pictures on flickr, and I got really envious of how beautiful people's personal Filofaxes were! I'd all but abandoned my personal filos, trying to trade them for A5s (which I will use for my hobbies etc), but I still wanted to use a personal Filofax for something, purely because I wanted to have one that looked as pretty as other people's!!
But a couple of days ago, when I tried to set up a personal Filofax as a kind of project to-do list filo, to use in conjunction with my Midori, I felt absolutely no love for personal sized Filofaxes! There was no magic there!!
So I put that idea- and the Filofax- back on the shelf. However, I decided to try to integrate the functionality of a Filofax into my Midori! No, not add rings to my Midori- but a couple of much simpler hacks!
1) Making a Filofax paper notebook
This is an idea that I have had for a while- to be able to have pages that are easily removeable and repositionable, stick them into a notebook etc with washi tape!
It's really a simple idea! I already have tonnes of personal sized Filofax paper (literally, a whole boxful!!), and because I'm not using personal sized filos that much any more, I really need to use it for something! The paper size is perfect to fit on Midori-sized paper, too- no trimming necessary! And it's quite a brilliant idea, because I can put the pages into a personal sized filo to archive, and I can transfer already written-on pages from my personal sized filos and just stick them in! All you have to do is take some washi tape, and stick the pages down. You don't have to do the top and bottoms like I've done, you could just do the corners if you want. The pages are easily removeable because of the washi tape, and you can re-order the pages inside the notebook (although this does take longer and is more fiddly than rearranging pages in a Filofax!), or remove a used-up page, and replace it with a fresh one!
I love this idea. It means that theoretically I never have to buy another notebook for my organisation section, as I can just replenish the finished pages for my lists. If I had used a regular notebook, I would have gradually used up pages, had lots of finished lists (e.g. shopping lists) in with unfinished lists, things would have got out of order, and ongoing lists (such as my long-term to-do list) would be broken up with other lists in between the pages. It also means that my pages are prettier and more interesting- something that I found boring when I stopped using my Filofax, in which I used lots of different types of paper- different colours and different formats, lined, squared, etc- was that 'regular' notebooks are made of one coloured and one format paper! So now I can use whatever type of paper I like in my organisation notebook! And the washi tape is so pretty!!
The only trouble with this idea is that the washi tape sometimes lifts up, so you have to keep sticking it back down- but none of my pages have ever fallen out!
2) Making a Filofax-paper insert!

I love this one- I'm really proud of it!
It's quite simple to do! You need 2 personal flyleafs or dividers, a treasury tag (7cm or longer), and the Midori zip-lock insert.
Step 1- Take the 2 flyleafs with the hole sides in the middle, and Scotch tape them together at the top and bottom. (Scotch tape is better for this than normal sticky tape- but you could also use washi tape!). You need to leave a 2mm gap between the 2 flyleafs, so that they don't rub against each other.
Step 2- Put the treasury tag through the back flyleaf's 3rd and 4th holes, so that the string is at the back and the metal tags come to the front.
Step 3- Put your Filofax papers in between the flyleafs, and thread the treasury tag through the 3rd and 4th holes of the pages.

Step 4- Pull the metal tags through the holes of the front flyleaf- if you don't pull it through, the pages will slip around.
Step 5- Insert the back flyleaf into the flap of the zip-lock insert. This holds it in place inside your Midori!

Today I'm going to be showing you something special about my Midori Traveler's Notebook... How I'm turning it into a quasi-Filofax!!
I got my Midori 3 and a half weeks ago, and since then I've been happily turning it into my planner!

As you will probably know if you've seen my youtube videos, I used to use a personal sized Filofax as my planner. It consisted of 3 main sections: Diary, Organisation section (lists, lists, lists), and Reference (important information), and sometimes I had a notes section too.
Therefore, I knew that I had to have the same sections in my planner! It was fairly simple to set up, initially! I have 3 notebooks in my Midori- 1) Diary (WO2P), 2) Organisation notebook, and 3) My Notebook notebook! My Reference section will soon be transferred over to the back of my Organisation notebook!
If you haven't already, please see this post where I wrote about the set-up of my Midori :) - You don't have to watch the video, because the sound quality is poor!).
But I did struggle with some things... because my Midori isn't a Filofax!
I used a Filofax for almost 2 years, so it was difficult to transition to another system completely. For a while, I didn't transfer everything over, instead keeping my Osterley personal in Wine out with my old Filofax set-up, because it was my safety blanket! But soon I became more in love with the Midori, and less in love with the Filofax (faulty ring mechanisms made me bitter!), and I've put my Osterley back on the shelf, and started using my Midori for almost everything!!
But even though I fell in love with my Midori, I still found that I couldn't do some of the things in it that you can with ease inside Filofaxes, such as rearranging pages. That is an obvious thing to say, because the Midori doesn't have rings, but you don't realise it until you really miss the flexibility of it!!
Also, I watch a lot of filofax videos, and see a lot of pretty pictures on flickr, and I got really envious of how beautiful people's personal Filofaxes were! I'd all but abandoned my personal filos, trying to trade them for A5s (which I will use for my hobbies etc), but I still wanted to use a personal Filofax for something, purely because I wanted to have one that looked as pretty as other people's!!
But a couple of days ago, when I tried to set up a personal Filofax as a kind of project to-do list filo, to use in conjunction with my Midori, I felt absolutely no love for personal sized Filofaxes! There was no magic there!!
So I put that idea- and the Filofax- back on the shelf. However, I decided to try to integrate the functionality of a Filofax into my Midori! No, not add rings to my Midori- but a couple of much simpler hacks!
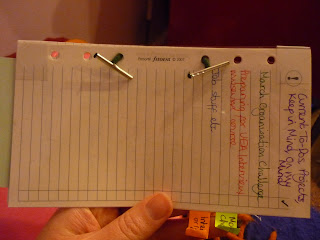
1) Making a Filofax paper notebook
 |
| In my hand-made Organisation Notebook, which I made myself! |
This is an idea that I have had for a while- to be able to have pages that are easily removeable and repositionable, stick them into a notebook etc with washi tape!
It's really a simple idea! I already have tonnes of personal sized Filofax paper (literally, a whole boxful!!), and because I'm not using personal sized filos that much any more, I really need to use it for something! The paper size is perfect to fit on Midori-sized paper, too- no trimming necessary! And it's quite a brilliant idea, because I can put the pages into a personal sized filo to archive, and I can transfer already written-on pages from my personal sized filos and just stick them in! All you have to do is take some washi tape, and stick the pages down. You don't have to do the top and bottoms like I've done, you could just do the corners if you want. The pages are easily removeable because of the washi tape, and you can re-order the pages inside the notebook (although this does take longer and is more fiddly than rearranging pages in a Filofax!), or remove a used-up page, and replace it with a fresh one!
I love this idea. It means that theoretically I never have to buy another notebook for my organisation section, as I can just replenish the finished pages for my lists. If I had used a regular notebook, I would have gradually used up pages, had lots of finished lists (e.g. shopping lists) in with unfinished lists, things would have got out of order, and ongoing lists (such as my long-term to-do list) would be broken up with other lists in between the pages. It also means that my pages are prettier and more interesting- something that I found boring when I stopped using my Filofax, in which I used lots of different types of paper- different colours and different formats, lined, squared, etc- was that 'regular' notebooks are made of one coloured and one format paper! So now I can use whatever type of paper I like in my organisation notebook! And the washi tape is so pretty!!
The only trouble with this idea is that the washi tape sometimes lifts up, so you have to keep sticking it back down- but none of my pages have ever fallen out!
2) Making a Filofax-paper insert!

I love this one- I'm really proud of it!
It's quite simple to do! You need 2 personal flyleafs or dividers, a treasury tag (7cm or longer), and the Midori zip-lock insert.
Step 1- Take the 2 flyleafs with the hole sides in the middle, and Scotch tape them together at the top and bottom. (Scotch tape is better for this than normal sticky tape- but you could also use washi tape!). You need to leave a 2mm gap between the 2 flyleafs, so that they don't rub against each other.
 |
| Difficult to see in the photo! |
Step 2- Put the treasury tag through the back flyleaf's 3rd and 4th holes, so that the string is at the back and the metal tags come to the front.
Step 3- Put your Filofax papers in between the flyleafs, and thread the treasury tag through the 3rd and 4th holes of the pages.

Step 4- Pull the metal tags through the holes of the front flyleaf- if you don't pull it through, the pages will slip around.

Step 5- Insert the back flyleaf into the flap of the zip-lock insert. This holds it in place inside your Midori!

I love my little invention- it means that I can keep my lists for my current projects and most important things at the front of my Midori, and therefore at the front of my mind! I can add, rearrange or remove pages as I need!!
So there you have it! That's how I'm turning my Midori Traveler's Notebook into a quasi-Filofax!!
If you have any questions, just ask!! :D
So there you have it! That's how I'm turning my Midori Traveler's Notebook into a quasi-Filofax!!
If you have any questions, just ask!! :D
Great idea....
ReplyDeleteI am swapping betwenn Midori-Filofax-Mulberry and can't decide which is better :-/
a Filofax-paper insert is a genious idea! I can't use a bound notebook because I constantly switching paper around, and this is the solution if I'll be tired of my filofax!
ReplyDeleteI really enjoyed your story. I too struggled at first because I didn't want to waste paper in my notebooks, and the other thing was, I hadn't designated which notebook was for what yet. This makes a decision less permanent.
ReplyDeleteVery awesome! I'm just now catching the Midori notebook fever. But since I'm a perfectionist, I don't want my "throw-away" scribblings cluttering up everything! I have seriously flirted with getting a Filofax just because I would like to remove or rearrange pages at my leisure, but ultimately the aesthetics and ring-hazards just don't sell me on the idea. So, Midori it is.
ReplyDeleteCan you tell me, though, what is a "treasury tag"? That part left me very confused (my natural state of mind). :)
And one other idea I was considering for removing unwanted pages: a perforation tool. Might be a silly investment, though.
I love my Midori! I especially love the bound aspect, for all of the reasons you described! Here is a link to some photos of treasury tags, hope this makes it clearer!
Deletehttp://goo.gl/JnWKAA (Copy and paste)